Page List

Monday, December 16, 2013

Gingerbread House of Cards

A couple months ago I was asked to participate in a cookie project. I eagerly agreed and I am so happy to be a part of this amazing project. Rebecca from The Cookie Architect is the ring leader of this project and she gets a big round of applause from me for getting us all together to make this happen. She put in a lot of work baking all the gingerbread pieces then cutting them out so precisely so they all fit together like a puzzle. Sending them out to us so we can put our inspiration onto the cookie. We all were to decorate each side a holiday theme of our choice.
My inspiration...."Intrigued by the intricate henna designs. I was inspired to incorporate holiday colors and a detailed design into one."  

So imagine 29 cookie artists from all over putting their creative talents onto a cookie that will be pieced with another cookie but different from theirs. Pretty fun right? Before I get into the final piece I want to mention this project was inspired by Charles & Ray Eames House of Cards. Here is an example...Of course this is made of card stock.
 Are you ready for the cookie version? Here it is...


Neat huh? I cannot imagine how long it took to piece them all together. Not to mention how careful one must be piecing it together. To see more close up photos of the individual artists CLICK HERE
Thanks for stopping by ♥ 


Monday, November 25, 2013

Polka Dotted Pumpkins

Fall is here and I finally made some pumpkin cookies. Phew...now I can relax LOL. Have you heard of this pretty awesome site called Design Seeds? It is a wonderful site if you are looking for a great way to inspire your color palette. You cannot go wrong with this site. I wanted to try something different from my usual bright and vibrate colors I love to decorate with. So I picked a beautiful autumn color palette and went from there. This is the one I chose...
 I used this color palette to inspire these pumpkins.
After flooding all the colors and they were dry I added some fun polka dots. I added these by dipping a toothpick in some gold luster dust along with various shades of AmeriMist sheen colors.
Then I used some ivory food coloring mixed with some water and added some shading to give it some dimension. Fun FUN!!!
Thanks for stopping by ♥ 
Wishing everyone a Happy Thanksgiving! XOXO

Saturday, November 2, 2013

Sugar Skulls

One last hoorah for Sugar Skulls this year. I had all the colorful icing left over from my last set of skulls I just did. I figured I would make good use of it and make some more. As most of us cookiers know mixing all the different colors is tedious and time consuming but oh so pretty when you have all the colors lined up in their perfect little piping bags ;) So it is good timing when you can use all the colors on a different set of cookies if possible.

Usually when I bake cookies I will make a batch of dough then just cut out various shapes with plans to decorate in the next few days...weeks or months. The nice thing about decorating cookies for my own creative sanity is doing them when I want and how I want. I usually have undecorated cookies in the fridge just waiting for me to get inspired and get all colorful on them lol.

So I made these super colorful Sugar Skulls with cut out flowers for the eyes. I used a Plunge Flower Cutter (usually used for fondant) to cut out by the eye area. Baked the cut out pieces and used the extra little flower cookies for eyes. Flooded the skulls and the flowers white then colored with airbrush. After they were all dried then I added all the colorful piping designs.
Here are some close ups of the eyes as cookies and cut outs..

Thanks for stopping by ♥ 
Happy weekend to you ALL!!!!

Monday, October 28, 2013

Sugar Skull cookies with HORNS!!!!

Sugar skulls seem to be really popular these days. I really enjoy seeing them. All the different colors, designs and mediums. From tattoos to t-shirts to jewelry to cookies.  Day of the Dead (Spanish: Día de Muertos) is a Mexican holiday celebrated throughout Mexico and around the world in other cultures. The holiday focuses on gatherings of family and friends to pray for and remember friends and family members who have died. The celebration takes place on October 31, November 1 and November 2 but you can find these colorful skulls in many places throughout the whole year.     

I made a Day of the Dead Gingerbread Man last year so this year I wanted to try something different. I saw the coolest ornaments at Cost Plus World Market. I decided I wanted to try and make a cookie version of them. Here is a pic of my inspiration...
  Now on to the cookie...I cut out a simple skull cookie using my Wilton Skull Cutter and then just hand cut some horns. Added the hand-cut horns to the skull and then baked the cookie. That's it. Pretty simple. After they were baked the fun began. Lots of intricate designs with plenty of colors. 

Alot of fun. I hope these encourage you to try and make these as well. Pretty lil devils hee hee.
Thank you for stopping by ♥

Saturday, October 26, 2013

Heart Rib Cage Cookies

I saw this super cool print on a T-Shirt awhile ago and like most cookiers you see something and think "how can I get that on a cookie?" Perfect timing with Halloween coming up and all. So I made these fun ribcage heart cookies. After piping the white bones onto the cookie it just needed something else so I painted some shadowing to give it some depth. Just thinned down some ivory food coloring with water and shaded the edges. To top it off.....cuz we always have to top it off with something lol. I added a glittery heart. Kinda turned a creepy cookie into a cute cookie I guess. But then again some would still say this is a creepy cookie. I prefer creepy Muahahaha!!!
Hope everyone is enjoying this beautiful fun month of October!!
And because two pictures is better than one ;)
Thanks for stopping by ♥


Monday, September 23, 2013

2ND ANNUAL GO BO! FOUNDATION BAKE SALE

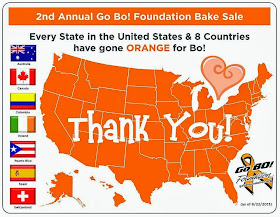
It has been about five months since I decorated cookies. Yep...went through a little cookie burnout stage. Well there could not of been a more perfect come back cookie so to speak. This is the 2ND ANNUAL GO BO! FOUNDATION BAKE SALE. Last year I made cookies for this amazing event and here we are again one year later. This year is even BIGGER...All 50 states and 8 countries have gone orange for Bo. Pretty exciting!! There are going to be so many cookies and baked good at this years event the people coming to check it out are not going to know where to start.
  
Info on the Event Bake Sale on Facebook...

So now on to my cookies. The theme this year is Autumn/Fall and Halloween cookies. I decided to go with the Autumn theme and make some leaf cookies. Added some henna inspired designs with the perfect gold touch of "Go Bo!" I am really happy with them because they are for a great event and I feel blessed that I can donate to such a beautiful foundation that is doing so much. 

For more information on Bo and the foundation you can go here...
 YOLO
You Only Live Once.

It's a lesson that Bo taught all of us.

Cherish every moment.
Live. Laugh. Love.

"You only live once so make it count. Just think about what you do. Think about what matters. Live your life like it's your last."
- Bo


Monday, April 15, 2013

Piggy Bank Cookies

I wanted to share a fun cookie today....Piggy Banks. These are special piggy banks. The kind you can eat. Not only a cookie but a yummy piece of chocolate as well. Sugar cookies & chocolate go great together so why not. I got a pack of those chocolate gold coins at the store and thought these need to go on a cookie...
Drew out some fun designs and here they are...
A fun traditional piggy bank with a blingin' sparkly $
Ruffles for a piggy in a tutu :)
 Fun wild leopard print...
My Stache....because every piggy needs a stache.
What girl doesn't need a shoe fund...
Fun Fund....need I say anymore?
And my favorite...Good Fortune piggy bank.
After decorating add some royal icing to the back of the cookie and the coin will stick after it's dry...
 Thanks for reading. Happy cookie-ing :)


Monday, April 1, 2013

Happy (belated) Easter

Hi everyone. I am a day late but I hope everyone had a nice Easter weekend. I was not on my computer much yesterday so I failed to post my Easter cookies I made. I made them a couple weeks ago or so but was planning on posting them here on Easter. Some of you may have already seen them on Facebook. This Easter I wanted to try something different. Not the typical eggs and bunnies. Even though I find them adorable I wanted to try something different. I had three sun/flower cookies baked so I was doodling and coming up with some fun Easter designs. The first one was with a bunny. I thought how cool it would be to have the bunny ears going in each of the petals around the cookie. Then it dawned on my that the design I was drawing looked like a kaleidoscope. So I figured I would do a chickie and lamb as well.
I have gotten in the habit of tracing the cookie cutter onto paper and doodle the design. It makes it easier when the time comes to start decorating. I will even write the colors I want to use. Sometimes the designs and colors come out as planned sometimes they change. But overall it makes the process a little faster and easier. After flooding the base and adding some fun airbrush I made some circle royal transfers...the bunny face and the lamb/chick body. From there on out it was adding all the tiny details that made the design remind me of a kaleidoscope. So here are my Easter Kaleidoscopes ♥
And for the fun of it....since I was not on my computer much yesterday I was out on a beautiful hike. I wanted to share this photo. Any Tim Burton fans out there?
 You can get inspiration from anywhere and seeing this reminds me of Tim Burton. I'm sure he gets many of his inspirations from nature ;) I'm a big nature fanatic. I LOVE the outdoors. Getting out and taking a look around opens my mind for so much creativity. Im serious...Take a PEEK!

Thursday, March 21, 2013

Decoupage Flower Cookies

Decoupage: The decoration of the surface of an object with paper cut-outs.

 I remember this style back in grade school and high school. We used to make some of the coolest art projects by cut outs from magazines, fabric, construction paper and much more. Ahhh art class was ALWAYS my favorite next to P.E.  Yes I was one of the girls that loved P.E. ;)

Earlier this month I received a beautiful card for my birthday (thanks Mom) and I couldn't help to notice the creative and pretty flowers on the card. I hung on to it with the idea of a cookie design. So that brings me here. I started these cookies inspired by the card and the wonderful designs in each petal....
Pretty huh?
I wish I would of taken step by step photos of the process but honestly as I was doing these cookies I didn't think they would turn out as planned. WRONG! They turned out as I envisioned so lesson learned.....don't go into something thinking negative. I knew that already but dang I couldn't help myself LOL. 

I flooded some round cookies with white, airbrushed them with a pinkish purple color then flooded each of the colored sections for each petal. Letting each color/petal dry before flooding the next one to it. After that I painted the designs. See this is where I started becoming skeptical. It was not til after I piped the brown outlines that it really came to life in my eyes. Mixed some gold luster dust with gold air brush color and painted on the stems then adding a touch of glitter here & there. Ahhh sparkly in all the right spots. And here they are....
I'm very happy with these. Actually they are still sitting on my kitchen counter. I am going to cringe when my husband asks if he can eat them later this evening HA!


Tuesday, February 12, 2013

Be Mine...

Valentine's Day is coming up and I am reminded every time I step in a store. Does not matter if it is a grocery store, clothing store or a drug store. The hearts, candy and shades of red and pink hit you as soon as you step foot in. I am not one to get all crazy for Valentine's Day. Don't get me wrong I may indulge in a box of yummy conversation hearts....I ♥ NECCO or buy a cute heart decoration for the cuteness of hearts. Other than that it is just another day. Funny because Valentine's Day was a lot of fun as a kid. I can remember making cute Valentine's Day holders to tape to the side of my desk in school and then we would all go around and drop our cute little Valentine's in every ones holder. Always looking forward to seeing which one I got from the few boy crushes I had. Then we would have cupcakes, cookies and punch before school was let out. What a FUN day for a kid. So saying that...
I made some fun fuzzy wuzzy 'be mine' bears. XOXO
 HAPPY VALENTINE'S DAY!!!

Monday, February 11, 2013

Butterfly L♥VE

A group of cookie friends decided to send some butterfly love to a very special friend whose Mother had recently passed. Butterflies  represent many things, to ME a butterfly represents not only beauty but a Celebration of Life. A butterfly emerges from it's cocoon and flutters away in it's new life.
Beautiful isn't it? I think so. 
Okay now on to the cookies... I was excited to make butterfly cookies since I have yet to make some. I cut about four to decorate figuring I will mail my favorite. Well I got sick and was unable to finish in time. They sat out and got stale LOL. A week later I baked a couple more so I could send her a fresh one. Because we all know that fresh cookies are the best unless your my husband that really doesn't care because he will dip the cookie in milk to get it soft again haha! Sometimes the second go around your cookie ideas are even better because I also baked some hearts to add to them. The "Love" heart was not in my original idea. 
With that being said here is my cookie for a very special friend ♥ Beautiful...just like her! XOXO
     Butterfly Wings
Like a butterfly emerges
And unfolds its graceful wings,
A child grows and develops
With the love a mother brings.
I'm thankful for the times
When you encouraged me to try,
For God gave me my wings,
But, Mom, you taught me how to fly.
~ Robin Fogle

Monday, January 28, 2013

A Groovy Cookie Project

Another fun cookie project I joined in on. This one was using this fun cupcake cutter designed my Pam at CookieCrazie. Idea was to take this cutter and design a cookie...."No theme involved......just use your imagination with this cutter."
So of course I was not going to make a cupcake. We have all seen so many cupcake cookies out there. Don't get me wrong...a cupcake cookie can be so very cute & I have seen some wonderful ones. I looked and looked at this cutter and the ideas started popping up in my head. For some reason I saw BIG hair. I traced the cutter design on paper and from there I got some ideas online and then my design came about.
The star glasses and the hair pik are royal icing transfers. Added some black sanding sugar to the hair to give it some texture and there we go...GROOVY isn't it? 
I must of made 20 royal icing hair piks. They all were breaking. So fragile but then I was being very impatient by not letting them dry for a full day. Finally....FINALLY I was able to get one in ONE piece.
Very fun project. Or should I say GROOVY project.
I love my big afro hair groovy chick and I think its so fun!
Here is the collage and links to all the others that participated. I just love how creative everyone is. The ideas that were put onto a cookie from a cupcake cutter are brilliant. Don't you think??
1 Jacinda - Ali's Sweet Tooth
2 Shannon - Artfully Delicious
3 Laurie – Cookie Bliss
4 Andrea – Cupookie
5 Nicole - Life's A Batch
6 Lorraine – Lorraine’s Cookies
7 Melissa – The Baked Equation
8 Nancy – Seasons of Joy 
9 Michelle
11 Tricia – The Cookie Loft Girls
12 Heather – Sugar Nosh Treats
14 Pam - CookieCrazie